Out of the box, Kentico EMS provides a full-featured content management and online marketing platform. However, many enterprises are heavily invested in a microservices architecture or in existing web applications, making the adoption of a conventional CMS difficult. As I presented at Kentico Connection, Kentico’s modular architecture and robust API provide an excellent solution for this. An enterprise, by using a headless architecture, can leverage Kentico’s powerful features without disruptive platform changes or major rewrites.
After sharing how a headless architecture enables any enterprise to adopt Kentico EMS, I’ve turned my focus towards what it takes to implement Kentico’s email marketing features in such a decoupled architecture. Kentico’s email marketing features are especially powerful, because they are integrated with Kentico’s contact management, activity tracking, scoring, and marketing automation features. This integration allows, for example, a marketer to personalize the content sent in a newsletter, based on each user’s website activity. Recently, I described how to enable Kentico’s email tracking in a headless architecture. Today, I’ll describe how to do the same for Kentico’s subscription and confirmation features.
Kentico’s subscription features include the ability for users to subscribe to newsletters, unsubscribe from newsletters, and confirm subscriptions using double opt-in. In a traditional deployment, these features are provided using endpoints and components that are built in to the Kentico website. However, in a headless architecture, the website is provided separately, even using a different technology stack. This means API endpoints must be added to the solution that enable the decoupled website (i.e. “the head”) to integrate with Kentico’s subscription features. Here’s how we did this for one of our customers.
Adding a Subscribe Endpoint
In a headless architecture, a website still needs the ability to provide subscription forms for Kentico newsletters. To enable a form to be added to a page, we included fields in the content that allow authors to specify a newsletter. This allowed the Kentico newsletter code name to be returned to the website through our existing content API endpoints. To complete the circle, we provided an endpoint that allowed the website to submit a user's email address along with the author-specified newsletter code name.
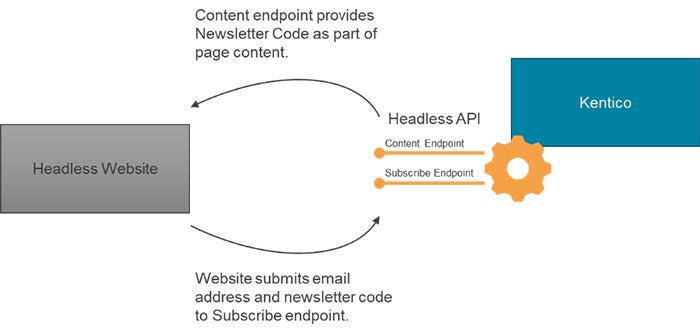
The subscribe endpoint is created with the following specification:
- URL: /v1/{sitecode}/subscription/optins
- Verb: POST
- Route parameters:
- Site code: The site code that the Kentico newsletter belongs to.
- Body parameters:
- Newsletter code: The newsletter code name originally specified by the page author.
- Email: The email addressed provided by the end user.
- First Name
- Last Name
Kentico’s robust API made it easy to implement this endpoint, using the following steps:
- Get the NewsletterInfo for the subscription.
var newsletter = NewsletterInfoProvider.GetNewsletterInfo(newsletterCode, siteID); - Get a contact for the provided email address. The method GetContactForSubscribing will create a new contact if needed.
var contactProvider =Service.Resolve<IContactProvider>();
var contact = contactProvider.GetContactForSubscribing(email, firstName, lastName); - Subscribe the contact to the newsletter using the SubscriptionService. Ensure you use the SubscribeSettings provided, so that Kentico’s double opt-in feature will be used to confirm email addresses.
subscriptionService.Subscribe(customerContact, newsletter, new SubscribeSettings
     {
         AllowOptIn = true,
         SendConfirmationEmail = true,
         RemoveAlsoUnsubscriptionFromAllNewsletters = true,
     });
Adding a Confirm Endpoint
The confirm endpoint was created to enable Kentico’s double opt-in feature within our customer’s headless architecture. To perform a double opt-in confirmation, Kentico sends new subscribers an email with a confirmation link, including subscription hash and time parameters. In a typical implementation, Kentico provides the confirmation page. However, in a headless architecture, a separate site provides the page. Having the confirm endpoint enabled our customer’s website to provide the confirmation parameters, to authenticate the subscriber and complete the subscription.
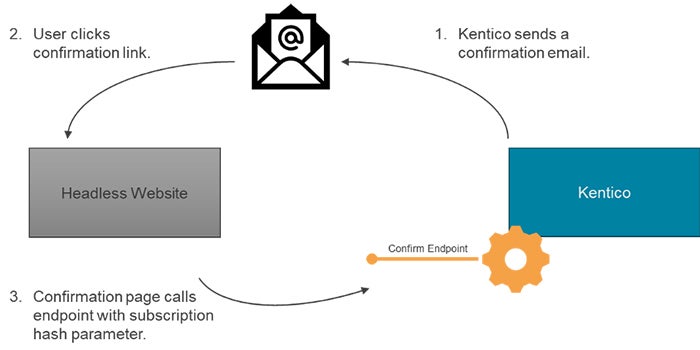
Here’s the specification of the confirm endpoint:
- URL: /v1/{sitecode}/subscription/approvals
- Verb: POST
- Route parameters:
- Site code: The site code that the Kentico newsletter belongs to.
- Body parameters:
- Subscription hash: A hash created by Kentico and added to the confirmation link.
- Subscription time: The time parameter added to the confirmation link used for authenticating the confirmation.
Again, Kentico’s open architecture made this easy to implement. Simply parse the parameters and call Kentico’s SubscriptionApprovalService:
var requestTime = DateTimeUrlFormatter.Parse(requestParameters.Time);
 var service = Service.Resolve<ISubscriptionApprovalService>();
 service.ApproveSubscription(requestParameters.SubscriptionHash, true, siteCode, requestTime);
Adding an Unsubscribe Endpoint
The unsubscribe endpoint is similar to the confirm endpoint, in that it is driven by a link provided in a Kentico email. Kentico marketing emails include an unsubscribe link that normally points to an unsubscribe page on a Kentico site. However, since the unsubscribe page is hosted on our customer’s separate site, an endpoint was provided for it to call when a user clicks the unsubscribe link.

Kentico emails provide a link to the website’s unsubscribe page, and provide parameters to identify the newsletter issue, subscriber email, and a hash to authenticate the link. Here’s the specification for the endpoint we provided for the unsubscribe page:
- URL: /v1/{sitecode}/subscription/optouts
- Verb: POST
- Route parameters:
- Site code: The site code that the Kentico newsletter belongs to.
- Body parameters:
- Issue Guid: Identifies the unique email issue created in a Kentico newsletter or email campaign.
- Email: The subscriber’s email address.
- Hash: A hash created by Kentico and added to the unsubscribe link.
The unsubscribe endpoint was implemented using the following steps:
- Validate the email hash.
var service = Service.Resolve<IEmailHashValidator>();
 var hashIsValid = service.ValidateEmailHash(hash, email);
- Get the IssueInfo defined by the issue guid.
var issue = IssueInfoProvider.GetIssueInfo(issueGuid, siteID);
- Call Kentico’s SubscriptionService to unsubscribe the user. You can call UnsubscribeFromSingleNewsletter to unsubscribe the user from a specific newsletter, or UnsubscribeFromAllNewsletters to unsubscribe the user from all newsletters.
var service = Service.Resolve<ISubscriptionService>();
 service.UnsubscribeFromAllNewsletters(email, issue.IssueID);
Closing Thoughts
Supporting Kentico’s subscription and confirmation features in a headless architecture is another great example in which Kentico’s open architecture and robust API shine. For my customer, this functionality was the key ingredient that made adopting Kentico so appealing. They were able to adopt Kentico’s powerful content management and online marketing features without disrupting their existing architecture.
Have questions on how to get the most out of your Kentico implementation? Drop me a line on Twitter (@HeyMikeWills), or view my other articles here.